Insulation
Spring Attic Inspection Checklist (Bay Area Guide)
March 5, 2026

Spring in the Bay Area is when many hidden attic problems finally show themselves: lingering moisture after winter rains, condensation from cool nights, and ventilation issues that can quietly damage insulation and reduce comfort.
This guide is a practical, homeowner-friendly checklist to help you spot early warning signs and understand what to do next. No panic. No guessing. Just a clear way to determine whether you need a simple fix or a professional attic assessment.
In this article:
-
Why spring is the best time to inspect your attic in the Bay Area
-
Signs of moisture and ventilation problems (and what they often mean)
-
Insulation issues you can spot (and those you can’t)
-
Common mistakes to avoid
-
What a professional attic inspection typically includes
-
Cost factors (what affects scope) and next steps
✅ Schedule an attic inspection & insulation assessment
If you’re seeing stains, musty odors, damp insulation, or ventilation concerns, start with a professional inspection and scope.
Schedule an Attic Inspection
Why spring is the best time to inspect your attic (Bay Area angle)
Spring hits a sweet spot:
-
Winter rains may have exposed minor roof or flashing leaks
-
Cool nights and mild days can create condensation conditions
-
Coastal fog and local microclimates can keep humidity higher than expected
-
Homes that “seemed fine” in summer can reveal moisture patterns in spring
The earlier you catch attic moisture or ventilation issues, the easier (and often cheaper) they are to resolve.
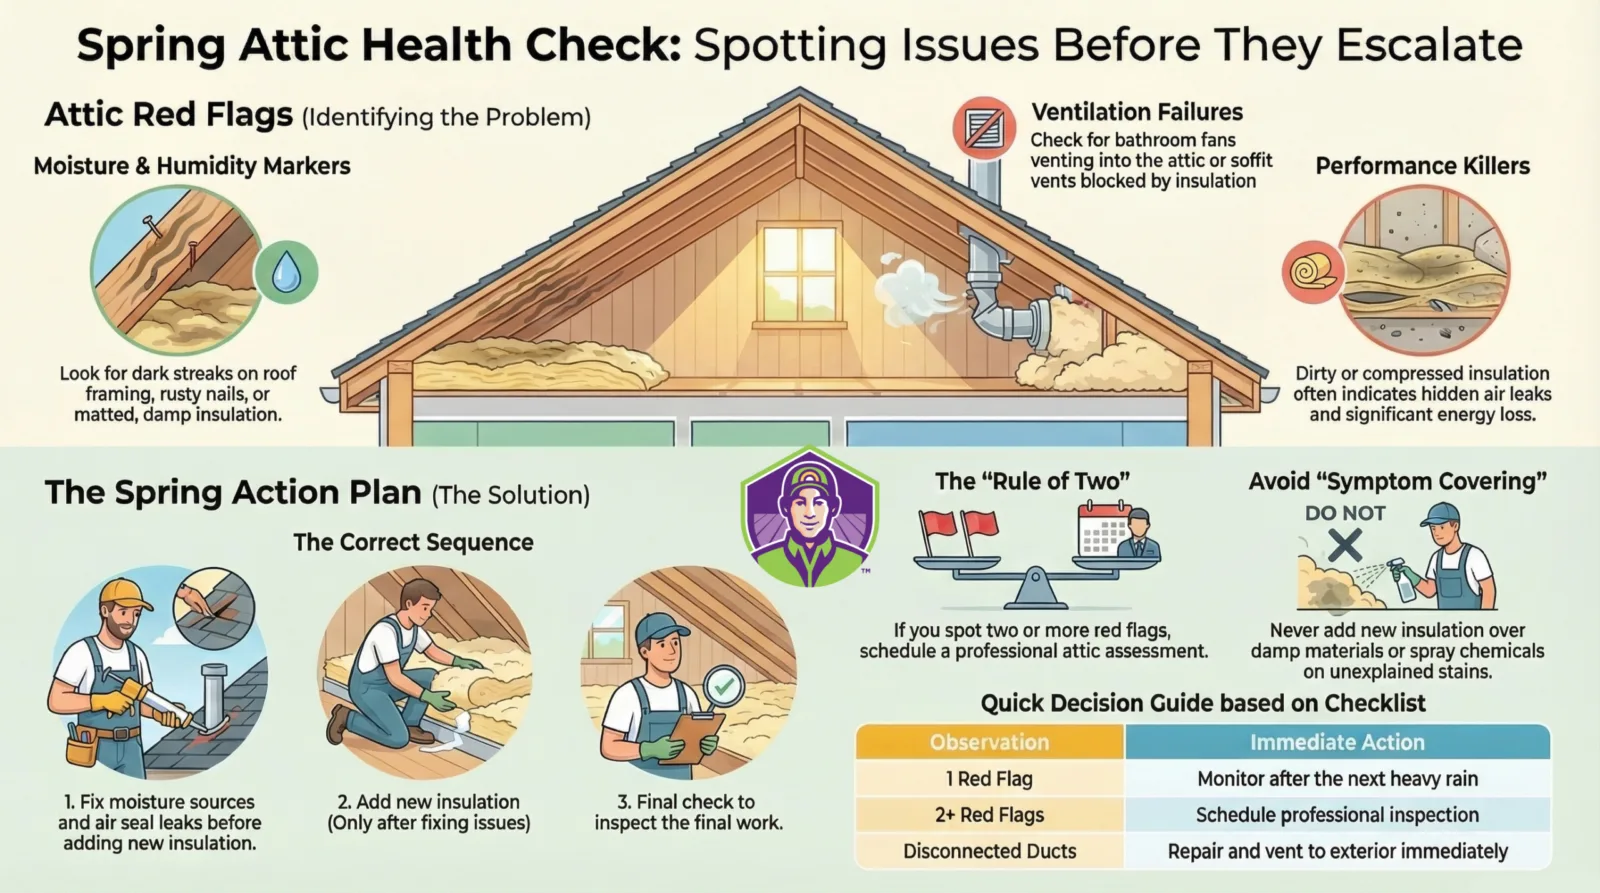
Signs your attic has a moisture or ventilation problem
You don’t need special tools to notice many early signs. During a quick inspection (or when you peek into the attic), look for:
Moisture-related warning signs
-
Staining on roof sheathing or framing (dark spots, streaks)
-
Damp or matted insulation (especially near edges or around vents)
-
Musty odor that seems stronger after rain or cool nights
-
Rusty nails or metal fasteners (sometimes a humidity clue)
-
Water marks around penetrations (pipes, vents, chimneys)
Not every stain is an emergency. But recurring stains or damp insulation are worth investigating.
Ventilation/airflow warning signs
-
Bathroom fan duct ending in the attic (or loose/disconnected ducting)
-
Flexible duct sagging with moisture inside (condensation can collect)
-
Visible “frosty” look in cold snaps (rare here, but possible in some conditions)
-
Strong temperature extremes in the attic relative to outdoors
-
Dust streaks around attic bypasses (air leaks moving dust)
Ventilation basics (without oversimplifying)
Attic ventilation is a system. It generally needs:
-
Intake (often at soffits/eaves)
-
Exhaust (often at ridge vents or roof vents)
Problems often happen when ventilation is:
-
blocked by insulation at soffits
-
unbalanced (exhaust without intake, or vice versa)
-
compromised by poor duct routing or disconnected fans
A quick homeowner check:
-
are soffit vents visibly blocked by insulation?
-
are vents damaged, painted shut, or clogged?
-
do bathroom fans actually vent outside (not into the attic)?
If you’re not sure, that’s exactly what an inspection is for.
Insulation issues you can spot (and what you can’t)
Insulation doesn’t have to look “destroyed” to underperform. In spring, look for:
Common insulation issues
-
Compressed insulation (reduces performance and comfort)
-
Gaps or thin spots (especially around attic edges and penetrations)
-
Wind-wash (air movement near eaves that reduces insulation effectiveness)
-
Disturbed insulation from past work (HVAC, electrical, storage paths)
-
Dirty insulation (may indicate air movement and dust pathways)
What you usually can’t diagnose visually
-
hidden air leaks under insulation
-
subtle moisture pathways behind framing
-
duct leakage issues that affect attic conditions
That’s why the best results typically come from: inspect → air seal → insulate (in that order).
What NOT to do (common spring mistakes)
Spring triggers the human urge to “spray something and move on.” Resist it.
Avoid:
-
Spraying chemicals to “treat” stains without understanding moisture source
-
Adding new insulation on top of damp insulation (can trap issues and reduce effectiveness)
-
Re-routing ducts loosely without proper termination or sealing
-
Blocking ventilation by pushing insulation into soffits
-
Ignoring small leaks because they “only happen in heavy rain”
If you suspect moisture, the goal is identifying the source and fixing conditions, not covering symptoms.
What a professional attic inspection typically includes
A professional inspection is structured and systematic. It often includes:
-
Checking roofline and penetration areas for leak patterns
-
Reviewing ventilation system basics (intake/exhaust, blockages, damage)
-
Evaluating insulation condition (coverage, compression, gaps, disturbance)
-
Identifying air bypasses (attic hatches, penetrations, recessed lights, top plates as applicable)
-
Noting ducting issues (especially bathroom fans and flexible duct problems)
-
Recommending scope options (targeted fixes vs comprehensive improvements)
This is where you move from “I think something is wrong” to a real plan.
Quick homeowner checklist (5–10 minutes)
If you want a fast “should I call someone?” check:
Look for:
-
Any damp insulation
-
Any active drip marks or fresh staining after rain
-
Musty odor that repeats seasonally
-
Disconnected or loose ducts (especially bathroom fans)
-
Blocked soffit vents due to insulation
-
Large gaps around penetrations (visible daylight or obvious openings)
If you see two or more of the above, an attic inspection is usually the smart move.
Cost factors (what influences scope and pricing)
Attic work isn’t one-size-fits-all. Scope and cost are influenced by:
-
attic size and access (tight hatch vs walkable)
-
level of moisture/insulation impact (localized vs widespread)
-
ventilation complexity (multiple fan ducts, damaged vents)
-
amount of air sealing needed (number of penetrations and bypasses)
-
whether insulation removal/cleanup is required before upgrades
The point of an inspection is to define a scope that fits your actual conditions, not a generic package.
Next steps (simple, effective plan)
A good spring plan looks like this:
-
Inspect the attic (moisture, ventilation, insulation condition)
-
If moisture is present: identify source (leak vs condensation vs duct issue)
-
Fix conditions first (venting/duct termination, leak repairs, airflow balance)
-
Air seal the major bypasses
-
Upgrade insulation (only after conditions are corrected)
-
Optional: attic cleaning if dust/debris/old material is an issue
If you notice signs of pest activity during inspection (droppings, rub marks, nesting), address entry points before investing in insulation upgrades.
✅ Schedule an attic inspection & insulation assessment
FAQ
Can a bathroom fan venting into the attic cause problems?
Yes. Bathroom exhaust air carries moisture. If it vents into the attic or the duct is disconnected, it can contribute to condensation, odors, and insulation issues over time.
How do I know if my attic ventilation is working?
If you see recurring condensation signs, damp insulation, or persistent musty odors, ventilation may be part of the issue. A professional inspection can confirm whether intake/exhaust is balanced and unobstructed.
Is a musty smell always mold?
Not always. Musty odor can come from moisture, dusty insulation, damp wood, or trapped humidity. The key is identifying the moisture driver and correcting conditions.
Should I add insulation before fixing ventilation or air leaks?
Usually no. Adding insulation before correcting moisture/venting or major air leaks can lead to disappointing results and can sometimes make moisture issues harder to spot.
What should I check after heavy rain?
Look for new staining, damp insulation, and water marks around roof penetrations (vents, chimneys, plumbing stacks). If patterns repeat, get an inspection.
